AutoGen Conversation Patterns: Learn how AI agents communicate
AI Agents are cool. They can solve a lot of problems in a few minutes or seconds. That’s assuming you set up the right conversation patterns in your application so that your agents work together not against each other.


Introduction
In a two-agent workflow, things are relatively simple since Agent A talks to Agent B and vice versa, however, it gets a bit more complicated when you have more than two agents. But worry not! AutoGen supports a bunch of conversation patterns that make implementing complex workflows a breeze.
Feel like watching this instead?
Click on the video below, and make sure to subscribe to my YouTube channel!
In this post, we're going to go over four ways in which AutoGen lets us define the conversation flow between agents:
- Two-Agent Chat
- Sequential Chat
- Group Chat
- Nested Chat
Pattern 1: Two-agent Chat
This is the simplest pattern. You can guess from the name that this involves two agents, usually a UserProxyAgent and an AssistantAgent. A good example of the Two-Agent chat pattern is a conversation between a client and a customer support specialist.
To initiate a two-agent chat, we'll need to specify at least:
- A recipient
- A message
...

user_proxy = UserProxyAgent(
    "user_proxy",
    human_input_mode="ALWAYS",
    code_execution_config=False
)

specialist = AssistantAgent(
    "specialist",
    llm_config=llm_config
)

user_proxy.initiate_chat(
    specialist,
    message="Hello, I need help!"
)
If we run the above code, the following happens:
- The
user_proxyagent sends"Hello, I need help!"to the recipient agent, thespecialist. - The communication between
user_proxyand thespecialistbegins.
Take a look at this illustration:
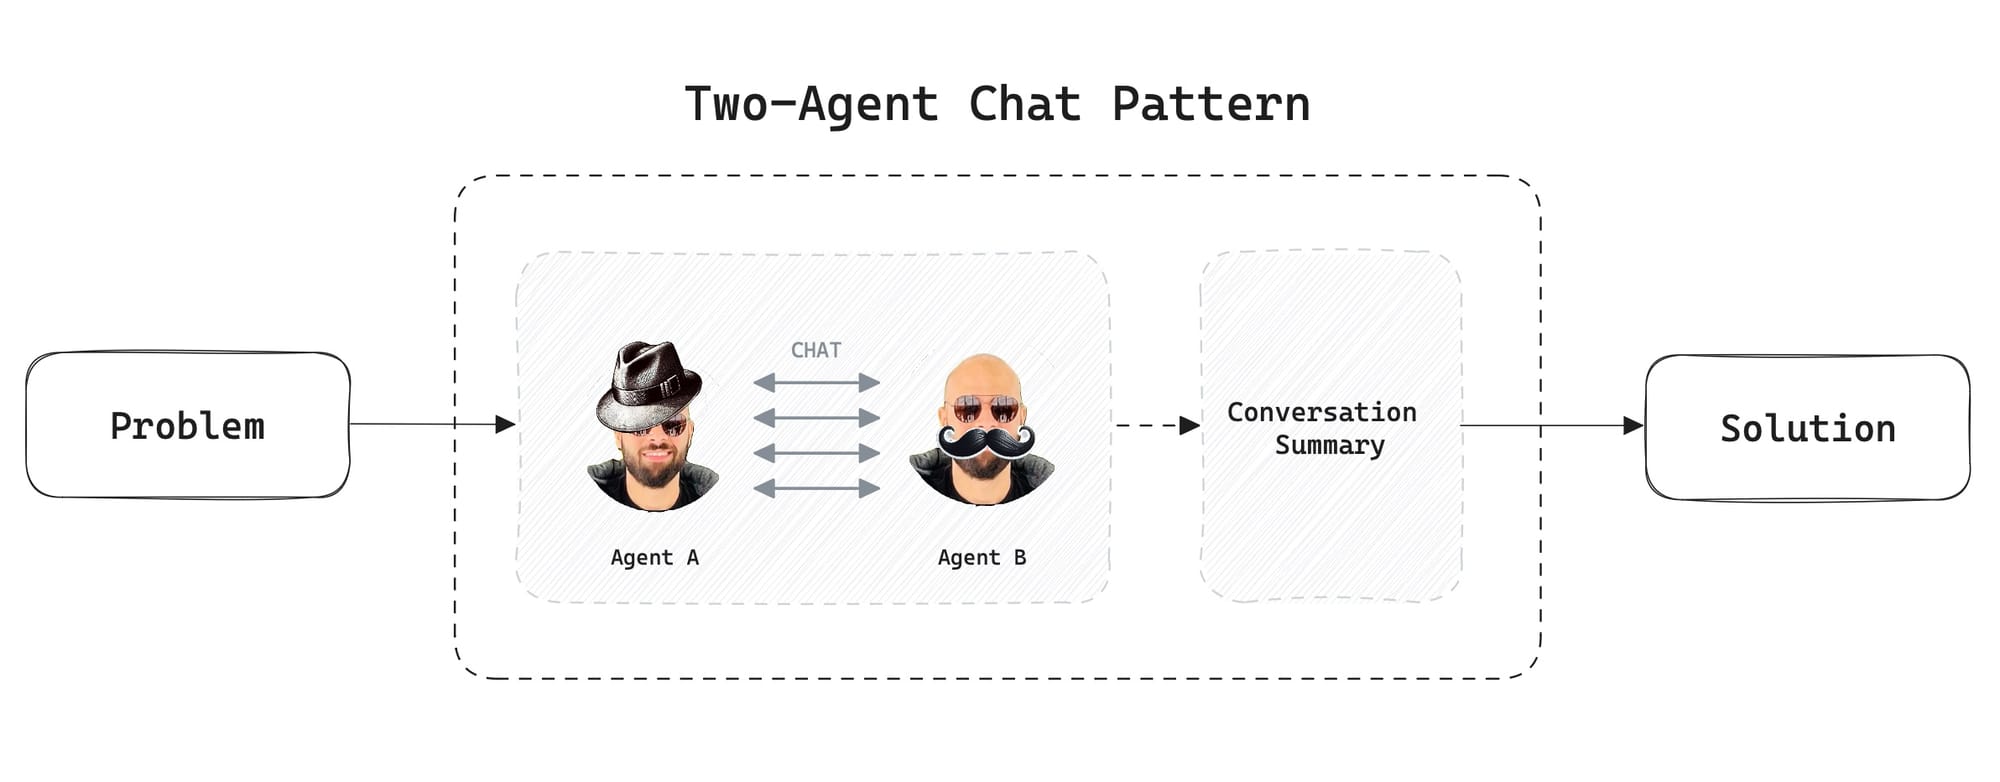
Agent A and Agent B begin a conversation with the end goal of figuring out a solution to the problem.
As soon as they figure it out, the history of the chat is transferred to a chat summarizer tasked with writing a summary of the conversation.
By default, the last message of the conversation is summarized, we could modify this by changing the optional summary_method parameter of the initiate_chat method.
Let's dive deeper and take a look at an actual conversation using the same code as above.
user_proxy (to specialist):

Hello, I need help!

--------------------------------------------------------------------------------
specialist (to user_proxy):

Of course! I'd be happy to help. Could you please describe the problem or task that you need assistance with?

--------------------------------------------------------------------------------
Provide feedback to specialist. Press enter to skip and use auto-reply, or type 'exit' to end the conversation:
That's great! Exactly what we want.
Ok, next we're going to take it one step further. We're going to add a Surveyor agent tasked to find out whether the customer was satisfied or not on a scale from 1 to 10.
Is the Two-agent chat pattern suitable? Well, obviously not, since we now have three agents.
Pattern 2: Sequential Chat
This pattern is useful when tasks must run in order, one after the other. It starts with two agents having a conversation then once the chat ends a summary of the chat gets carried over to the next conversation, and so on, until a solution is found.
To better understand this, let's stick to our previous example. Suppose that we need to get feedback on a scale from 1 to 10 from the customer about their support experience immediately after the conversation between the customer and the specialist ends. To do that, we'll create a new agent: surveyor.
Here's why this is a sequential pattern:
- The user and the specialist communicate.
- Once the conversation ends, a new conversation begins.
- A summary of the conversation is carried over to the next interaction between the customer and the surveyor.
- Once the customer responds to the surveyor the workflow concludes.
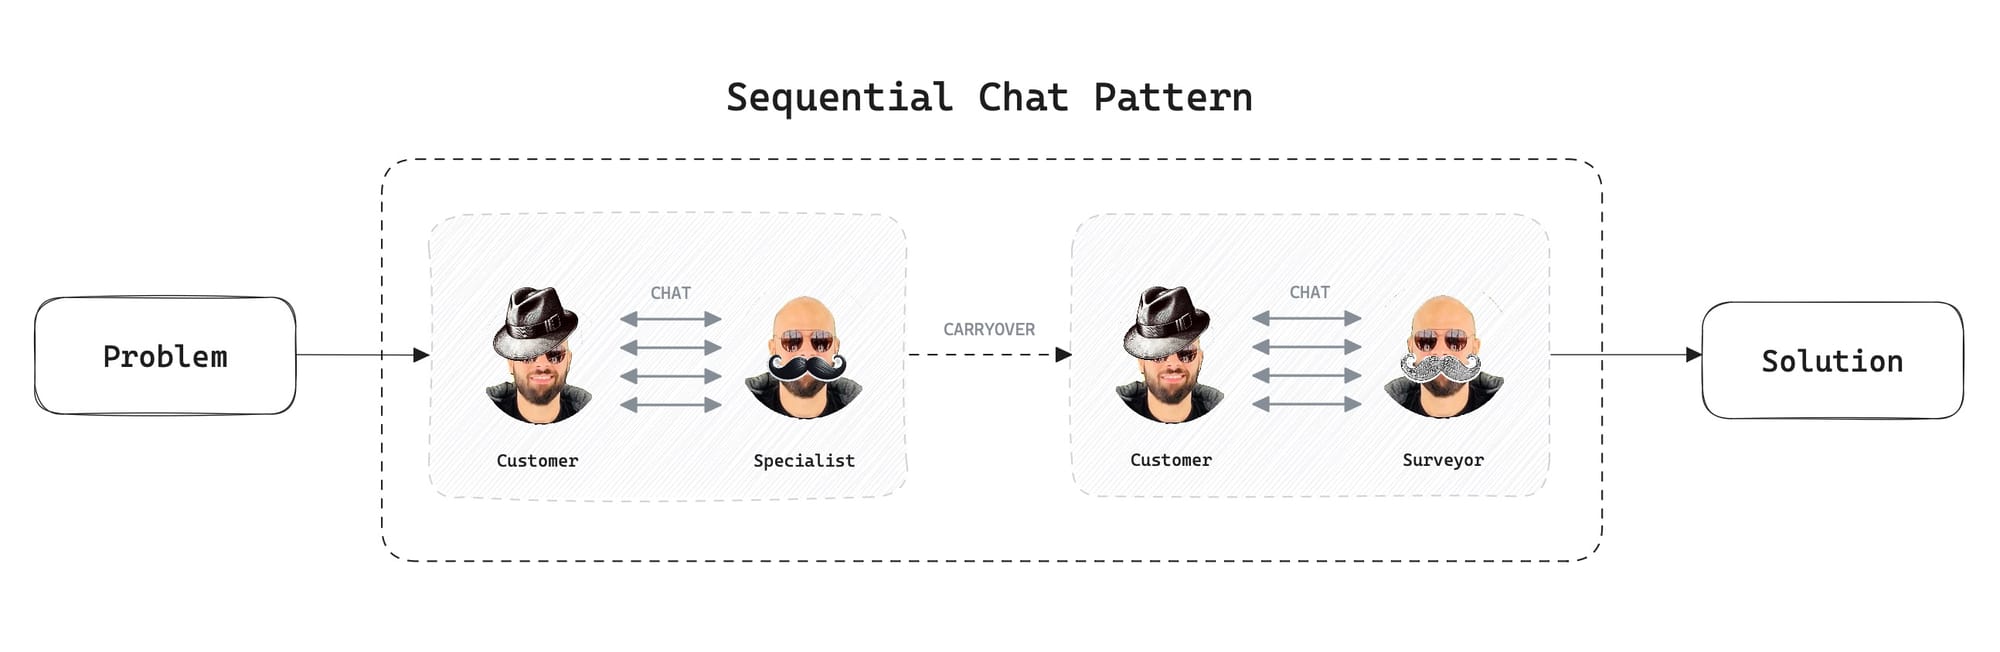
AutoGen uses the carryover property to move custom context from one conversation to the next.
Let's see how we can put this into code:
...

user_proxy.initiate_chats(
    [
        {
            "recipient": specialist,
            "message": "Hello! I need help.",
            "summary_method": "reflection_with_llm"
        },
        {
            "recipient": surveyor,
            "message": """
                Based on the provided information,
                determine whether the customer was satisfied or not.
            """,
            "carryover": "This is a new customer."
        }
    ]
)
Here's what happens when we run the code:
********************************************************************************
Starting a new chat....

********************************************************************************
user_proxy (to specialist):

Hello! I need help.

--------------------------------------------------------------------------------
specialist (to user_proxy):

Of course! How can I assist you today?

--------------------------------------------------------------------------------
Provide feedback to specialist. Press enter to skip and use auto-reply, or type 'exit' to end the conversation: What is the answer to 1+1?
user_proxy (to specialist):

 What is the answer to 1+1?

--------------------------------------------------------------------------------
specialist (to user_proxy):

The answer to 1+1 is 2.

--------------------------------------------------------------------------------
Provide feedback to specialist. Press enter to skip and use auto-reply, or type 'exit' to end the conversation: exit
Now, once this conversation ends. Another one starts immediately. It includes a summary or carry-over from the conversation above.
Take a look:
********************************************************************************
Starting a new chat....

********************************************************************************
user_proxy (to surveyor):


                Based on the provided information,
                determine whether the customer was satisfied or not.

Context:
This is a new customer.
The answer to 1+1 is 2.

--------------------------------------------------------------------------------
surveyor (to user_proxy):

On a scale of 1 to 10, how would you rate your support experience today?

--------------------------------------------------------------------------------
Provide feedback to surveyor. Press enter to skip and use auto-reply, or type 'exit' to end the conversation:
Cool. But now, let's kick it up a notch and add another agent. This agent provides the specialist with information whenever the customer intends to escalate or requests to prioritize their problem.
We'll call this new agent: Knowledge Base Manager or kb_manager. Let's see how to add it as part of a group chat.
Pattern 3: Group Chat
Alright, we now have the following agents:
- User Proxy (
user_proxy) - Customer Support Specialist (
specialist) - Knowledge Base Manager (
kb_manager) - Surveyor (
surveyor)
Take a look at this illustration to understand how a Group Chat works:
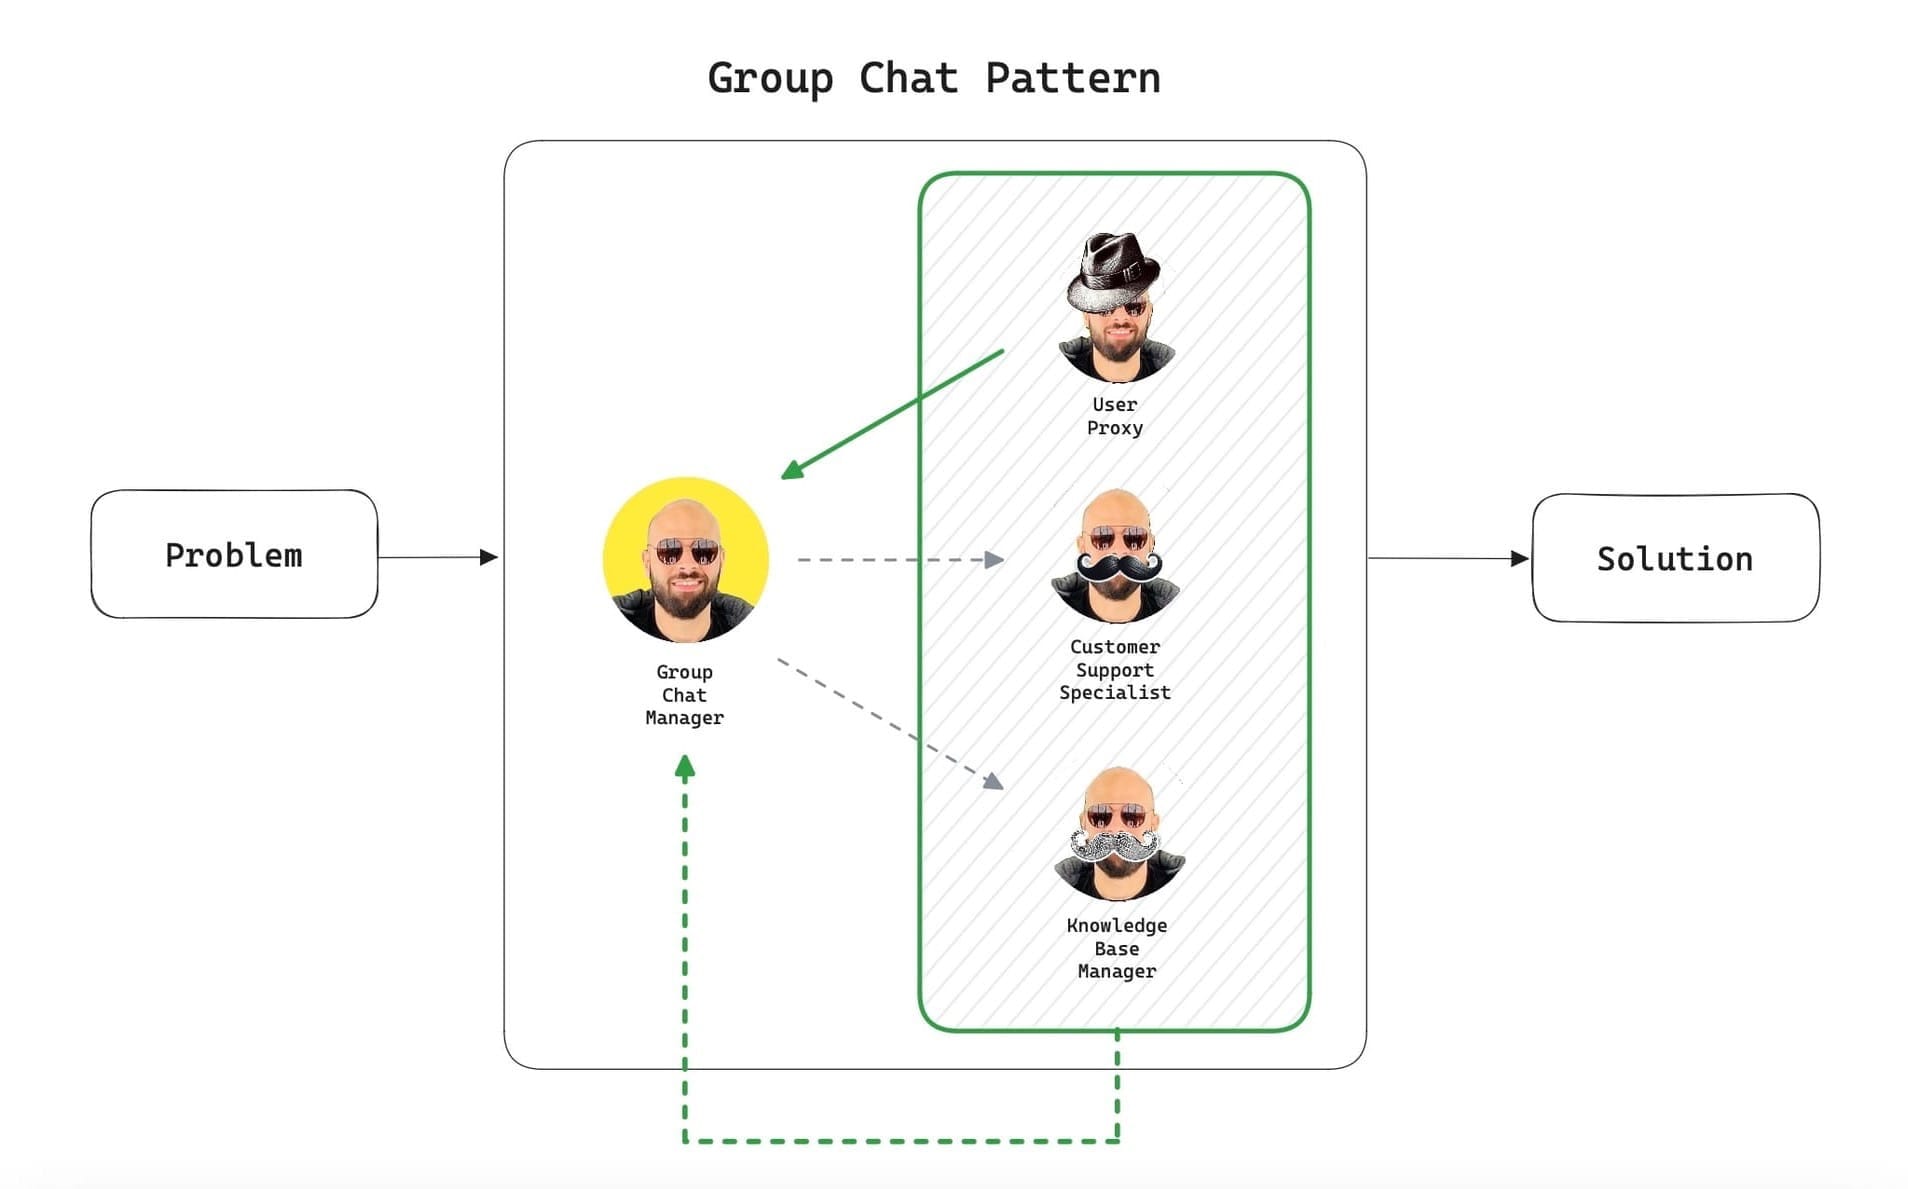
In a group chat pattern, the agents don't talk directly with each other anymore. Instead, everything is managed by the Group Chat Manager (a special agent) that uses an LLM to orchestrate the conversation flow.
The Manager chooses an agent from the group as the "speaker", and then the speaker agent talks to the manager. The manager then broadcasts the message to all agents and chooses the next speaker. This process continues until a solution is found.
Let's build it! Here's the Python code to initiate this workflow:
...

group_chat = GroupChat(
    agents=[user_proxy, specialist, kb_manager, surveyor],
    messages=[]
)

group_chat_manager = GroupChatManager(
    groupchat=group_chat,
    llm_config=llm_config
)

chat_result = user_proxy.initiate_chat(
    group_chat_manager,
    message="Hello! I need help.",
    summary_method="reflection_with_llm"
)
A few obvious changes:
- We added
GroupChatandGroupChatManagerobjects. - The first parameter supplied to
initiate_chatis agroup_chat_manager. (This is because all the messages will go through a single agent, the Group Chat Manager.)
As we've seen in the diagram earlier, the GroupChatManager will determine which agent must handle the next message. We can also customize this, by providing the GroupChatManager with a strategy defined in the speaker_selection_method parameter.
The following strategies are supported:
auto: The default strategy. This means that the next speaker is selected automatically by the LLM.manual: This means that the next agent is selected by the user, through user input.random: The next agent will be selected randomly.round_robin: The next speaker will be selected as defined in theGroupChatagentsarray.
Here's the output, after we run the code:
user_proxy (to chat_manager):

Hello! I need help.

--------------------------------------------------------------------------------
specialist (to chat_manager):

Hello! How can I help you today?


--------------------------------------------------------------------------------
Provide feedback to chat_manager. Press enter to skip and use auto-reply, or type 'exit' to end the conversation: How can I access my account?
user_proxy (to chat_manager):

How can I access my account?

--------------------------------------------------------------------------------
specialist (to chat_manager):

Please visit our website and enter your login credentials to access your account.


--------------------------------------------------------------------------------
Provide feedback to chat_manager. Press enter to skip and use auto-reply, or type 'exit' to end the conversation: Ok thank you
user_proxy (to chat_manager):

Ok, thank you.

--------------------------------------------------------------------------------
surveyor (to chat_manager):

On a scale of 1 to 10, how would you rate your support experience today?

--------------------------------------------------------------------------------
Provide feedback to chat_manager. Press enter to skip and use auto-reply, or type 'exit' to end the conversation: 10
user_proxy (to chat_manager):

10
Awesome! Here's a recap of what happened:
- The customer requests help accessing their account.
- The specialist advises visiting the website and entering login credentials.
- The customer is satisfied.
- Then the surveyor asks the customer to rate the experience.
We didn't specify any custom logic, the GroupChatManager was able to route each message to the best-suited agent.
GroupChatManager performs best when using GPT-4.Ok, cool. Now let's assume that the Knowledge Base Manager is taken out of the group and only needs to speak with the specialist. This will be a side conversation so the customer has no idea that the kb_manager exists. In AutoGen terms, this is called a Nested Chat.
That's where the Nested Chat workflow comes in.
Nested Chat
A nested chat is as the name implies, a conversation within a conversation. Based on our example we're going to set up a nested chat between the specialist and the kb_manager, so from the customer's perspective it is only talking to the specialist.
Check out this diagram:
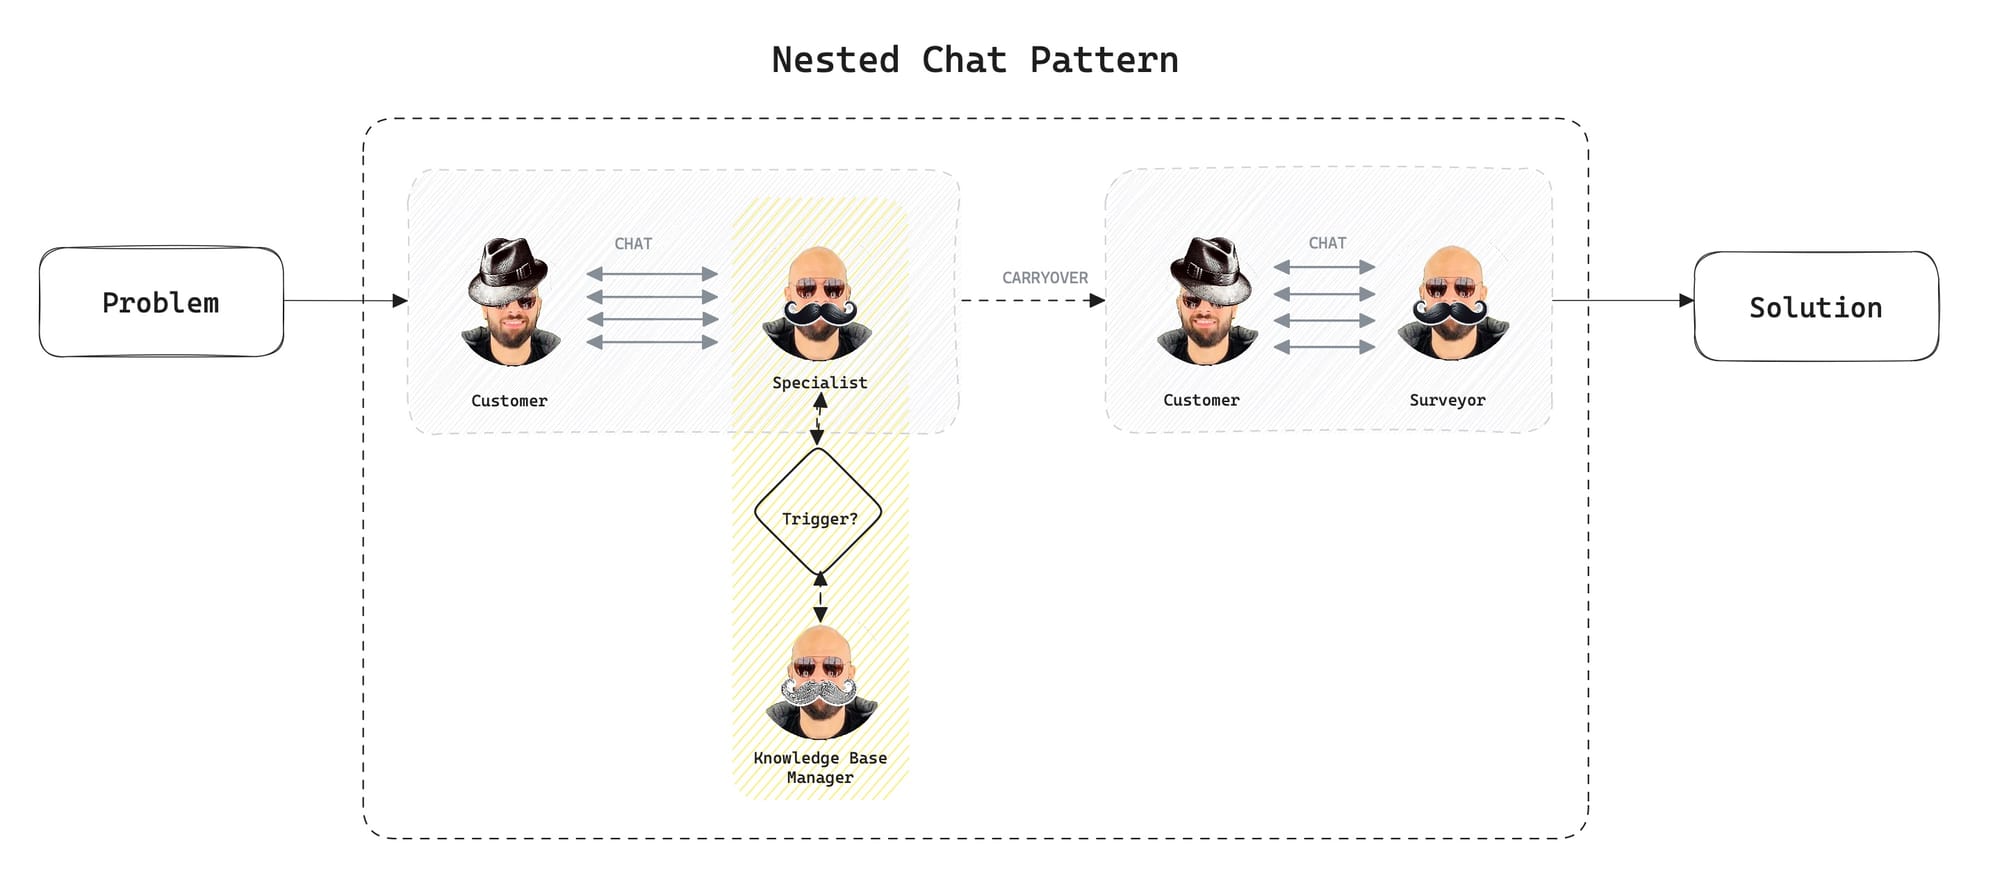
In a nested chat pattern, a side conversation will happen between agents whenever certain conditions are met. We'll need to supply a trigger parameter to the sender agent.
In this case, our triggers are going to be the user_proxy agent and a function that returns a boolean, meaning, whenever the user_proxy sends a message to the specialist and the function returns True, the nested chat will kick off.
user_proxy has no idea about the nested chat. It only interfaces with the specialist.Here's the code:
...

specialist.register_nested_chats(
    [
        {
            "recipient": kb_manager,
            "summary_method": "last_msg",
            "message": "Treat this urgently and respond in a professional manner.",
            "max_turns": 1
        }
    ],
    trigger=lambda sender: sender is user_proxy and should_escalate(sender)
)

res = user_proxy.initiate_chats(
    [
        {
            "recipient": specialist,
            "message":"Hello, I need help."
        },
        {
            "recipient": surveyor,
            "summary_method":"reflection_with_llm"
        }
    ]
)
We're using the register_nested_chat method to specify the recipient, message, summary method, and maximum turns for the chat.
To get a better idea of what's happening behind the scenes, take a look at the output after we run this code:
********************************************************************************
Starting a new chat....

********************************************************************************
user_proxy (to specialist):

Hello, I need help.

--------------------------------------------------------------------------------
specialist (to user_proxy):

Hello! How can I assist you today?

--------------------------------------------------------------------------------
Provide feedback to specialist. Press enter to skip and use auto-reply, or type 'exit' to end the conversation: This is important
Notice that our request now "This is important" contains the keyword "important" which will be used to identify and trigger the nested chat between the specialist and the kb_manager.
user_proxy (to specialist):

This is important

--------------------------------------------------------------------------------

********************************************************************************
Starting a new chat....

********************************************************************************
specialist (to kb_manager):

Treat this urgently and respond in a professional manner.

--------------------------------------------------------------------------------
kb_manager (to specialist):

Thank you for bringing this to our attention. We will look into this matter with urgency and endeavor to resolve it promptly. I will investigate further and reach out to you soon via email with an update. Thank you for your patience.

TERMINATE

--------------------------------------------------------------------------------
specialist (to user_proxy):

Thank you for bringing this to our attention. We will look into this matter with urgency and endeavor to resolve it promptly. I will investigate further and reach out to you soon via email with an update. Thank you for your patience.


--------------------------------------------------------------------------------
Provide feedback to specialist. Press enter to skip and use auto-reply, or type 'exit' to end the conversation:
Perfect, as you can see once the chat contains the word "important" the specialist started a nested chat with the kb_manager and the latter provided the specialist with the answer which was relayed to the user_proxy.
Now, let's type exit and wrap up this conversation with the surveyor:
Provide feedback to specialist. Press enter to skip and use auto-reply, or type 'exit' to end the conversation: exit

********************************************************************************
Starting a new chat....

********************************************************************************
user_proxy (to surveyor):


                Based on the provided information,
                determine whether the customer was satisfied or not.

Context:
Thank you for bringing this to our attention. We will look into this matter with urgency and endeavor to resolve it promptly. I will investigate further and reach out to you soon via email with an update. Thank you for your patience.


--------------------------------------------------------------------------------
surveyor (to user_proxy):

On a scale of 1 to 10, how satisfied were you with the customer support experience?

--------------------------------------------------------------------------------
Provide feedback to surveyor. Press enter to skip and use auto-reply, or type 'exit' to end the conversation:
And that's all for the Nested chat pattern!
Conclusion
Now keep in mind that you can mix and match workflows and conversation patterns to suit your specific use case. It's also critical to experiment with your messages or prompts based on the LLMs that you choose to maximize and optimize the quality and accuracy of the application.
So definitely experiment but keep an eye on your OpenAI billing page if you're using GPT since costs can creep up on you due to the many chats and context carried between the conversations.
Glad you've made it to the end. Thank you so much for reading, please make sure to check out the full video on YouTube for an in-depth overview of AutoGen Conversation Patterns and follow me on X for the latest updates.