Let's build a LangGraph app that helps you land your dream job
In this tutorial, we’ll build a LangGraph app that revitalizes your old resume, helping it shine and grab the attention of your future employer.

What is LangGraph?
LangGraph is a library built by the LangChain team that aims to help developers create graph-based single or multi-agent AI applications. As a low-level framework, LangGraph lets you control how agents interact with each other, which tools to use, and how information flows within the application.
No time to read? Watch this tutorial instead!
How does LangGraph work?
Let's zoom out and look at the different key components that make up LangGraph and how these components work together.
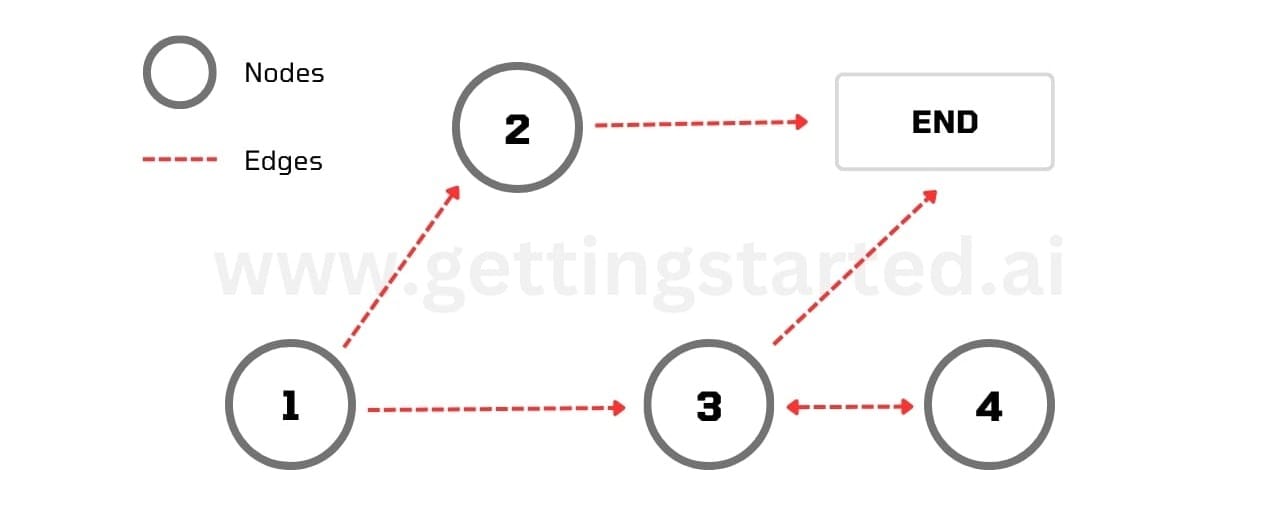
First, what is a graph? A graph in computer science refers to a data structure that represents relationships between objects. LangGraph uses this graph concept to organize AI agents and their interactions.
LangGraph State
What we don't see in the diagram above but is a central element within LangGraph is the State object. The State object is what holds context within the application, it can store values such as conversation messages and variables depending on the application needs.
The maintain context as information flows from node to node, the State is passed between each node in the graph. Each node will return an updated State once it has completed processing.
Here's an example of how we can define our application State:
...

from langgraph.graph import StateGraph, START, END
from langgraph.graph.message import add_messages


class State(TypedDict):
    messages: Annotated[list, add_messages]


graph_builder = StateGraph(State)
Here our State takes in a list of messages to maintain conversation history so that context is preserved between nodes. The add_messages built-in function determines how the list should be updated when new data is added to the State. In this case, the add_messages appends messages to the list.
We can then build our Graph by passing our State to the StateGraph class so that all graph nodes communicate by reading and writing to the shared state.
LangGraph Nodes
Nodes are defined as Python functions that can perform a set of actions. For example, a node can integrate with a large language model, process information, call an external API, or any other task.
A LangGraph node takes the state of the graph as a parameter and returns an updated state after it is executed.
Here's an example of a basic node, a Python function:
from langchain_openai import ChatOpenAI

...

llm = ChatOpenAI(model_name="gpt-4o")

def chatbot(state: State):
    return {"messages": [llm.invoke(state["messages"])]}
Here's another example of a chatbot node that uses a large language model:
Edges in LangGraph
A connection between two nodes is called an Edge. Edges in LangGraph can be either unidirectional (Connecting one node to another, see Node 1 and 2 in the diagram above) or bidirectional (See Node 3 and 4 in the chart above).
There are three different types of edges in LangGraph:
- Normal Edges: These edges are straightforward as they directly connect one node to another.
- Conditional Edges: These edges must process a function to determine which node to go to next based on application conditions and needs.
STARTandENDEdges: These special edges define which node to call when the graph initializes (START) and which nodes must connect to theENDnode to terminate graph execution.
Ok, I hope all is clear so far. Let's get started with the code!
Working with resume and job data
Let's assume we have two methods, one that returns the resume information and the other the job data. To keep things simple, we'll simulate data retrieval by doing the following:
Create a new folder called modules and inside create a new file, call it resume.py and paste the following:
from typing import List, Optional
from pydantic import BaseModel, Field, validator

class WorkExperience(BaseModel):
    job_title: str = Field(description="Job title or position.")
    company: str = Field(description="The company name.")
    experience: int = Field(description="Years of experience in the job.")
    responsibilities: List[str] = Field(description="List of responsibilities in the job.")

class Education(BaseModel):
    degree: str = Field(description="Degree obtained.")
    school: str = Field(description="The university name.")
    major: str = Field(description="Major subject.")
    year: Optional[int] = Field(description="Year of graduation.")

    @validator('year', pre=True, always=True)
    def set_year(cls, v):
        if v is None:
            return 0
        return v

class Resume(BaseModel):
    """Structured resume data."""

    name: str = Field(description="Name of the person")
    professional_summary: str = Field(description="Professional summary of the person.")
    work_experience: List[WorkExperience] = Field(description="List of work experiences held by the person.")
    education: List[Education] = Field(description="List of educational qualifications of the person.")
    skills: List[str] = Field(description="List of skills relevant to the jobs.")

    @classmethod
    def mock(cls):
        return cls(
            name='Jeff',
            professional_summary='Innovative software engineer with 8+ years of experience in the tech industry. Senior Developer at Company X, Freelance Software Architect, and Junior Developer at Company Y. Proficient in developing scalable applications, optimizing system performance, and leading cross-functional teams. Fluent in English and Spanish.',
            work_experience=[
                WorkExperience(
                    job_title='Senior Developer',
                    company='Company X',
                    experience=5,
                    responsibilities=[
                        'Led the development of scalable web applications',
                        'Optimized system performance and reduced server costs',
                        'Mentored junior developers and conducted code reviews',
                        'Collaborated with product managers to define project requirements',
                        'Implemented CI/CD pipelines to streamline deployments',
                        'Developed RESTful APIs for mobile and web applications',
                        'Ensured application security and compliance with industry standards'
                    ]
                ),
                WorkExperience(
                    job_title='Freelance Software Architect',
                    company='Independent Consultant',
                    experience=2,
                    responsibilities=[
                        'Designed software architecture for various clients',
                        'Provided technical consultancy and project management',
                        'Developed custom software solutions to meet client needs',
                        'Conducted system analysis and performance tuning',
                        'Integrated third-party services and APIs',
                        'Created technical documentation and user manuals'
                    ]
                ),
                WorkExperience(
                    job_title='Junior Developer',
                    company='Company Y',
                    experience=1,
                    responsibilities=[
                        'Assisted in the development of web applications',
                        'Performed bug fixes and code maintenance',
                        'Collaborated with senior developers on project tasks',
                        'Participated in daily stand-ups and sprint planning',
                        'Wrote unit tests to ensure code quality',
                        'Contributed to open-source projects'
                    ]
                )
            ],
            education=[
                Education(
                    degree='B.Sc. Computer Science',
                    school='X University',
                    major='Computer Science',
                    year=1999
                )
            ],
            skills=[
                'Software Architecture',
                'System Optimization',
                'Team Mentorship',
                'Project Management',
                'API Development',
                'Continuous Integration/Continuous Deployment',
                'Bilingual'
            ]
        )
The code above exposes a mock() method that returns sample resume data.
We'll do the same for job data, create a new file within the modules folder called job.py and paste the following:
from typing import List, Optional
from pydantic import BaseModel, Field

class Job(BaseModel):
    title: str = Field(description="Job title or position.")
    company: str = Field(description="The company name.")
    location: Optional[str] = Field(description="Location of the job.")
    salary: Optional[str] = Field(description="Salary range for the job.")
    description: str = Field(description="Detailed job description.")
    responsibilities: List[str] = Field(description="List of job responsibilities.")
    benefits: Optional[List[str]] = Field(description="List of job benefits.")
    employment_type: Optional[str] = Field(description="Type of employment (e.g., full-time, part-time).")
    posted_date: Optional[str] = Field(description="Date when the job was posted.")

    @classmethod
    def mock(cls):
        return cls(
            title='Software Engineer',
            company='Tech Corp',
            location='San Francisco, CA',
            salary='$100,000 - $120,000',
            description='We are looking for a skilled Software Engineer to join our team.',
            requirements=[
                'Bachelor\'s degree in Computer Science or related field',
                '3+ years of experience in software development',
                'Proficiency in Python and JavaScript',
                'Experience with Django and React',
                'Strong problem-solving skills'
            ],
            responsibilities=[
                'Develop and maintain web applications',
                'Collaborate with cross-functional teams',
                'Write clean, scalable, and efficient code',
                'Participate in code reviews',
                'Troubleshoot and debug applications'
            ],
            benefits=[
                'Health insurance',
                '401(k) matching',
                'Paid time off',
                'Flexible working hours'
            ],
            employment_type='Full-time',
            posted_date='2024-10-01'
        )
Great, now we'll wrap these mock methods and expose them as tools which will become part of the Tools node within our LangGraph graph.
To do this, in your main project directory, create a new file called tools.py and paste the following code:
from typing import Optional, Literal
from langchain_core.tools import tool

from modules.job import Job
from modules.resume import Resume

def process_job() -> Job:
    """Process job data."""
    job = Job.mock()
    return job

def process_resume() -> Resume:
    """Process resume data."""
    resume = Resume.mock()
    return resume

@tool
def get_job(field: Optional[Literal['title', 'company', 'location', 'salary', 'description', 'responsibilities', 'benefits', 'employment_type', 'posted_date']] = None) -> str:
    """Get job data."""
    job = process_job()
    if field:
        return getattr(job, field)
    return job.dict()

@tool
def get_resume(field: Optional[Literal['name', 'professional_summary', 'work_experience', 'education', 'skills']] = None) -> str:
    """Get resume data."""
    resume = process_resume()
    if field:
        return getattr(resume, field)
    return resume.dict()
We create two tools, get_job and get_resume, which accept optional fields and return either complete data or specific fields from the job and resume datasets.
Building the Graph
To bring everything together, we'll need to create our Graph which consists of a:
- Expert node: This node will integrate with OpenAI's GPT-4o.
- Tools node: This node will retrieve resume and job information.
We'll use the LangGraph MessagesState for this graph since we'll only need message history for context. You can read more about States here: https://langchain-ai.github.io/langgraph/concepts/low_level/#state
Create a new file called agent.py in your main directory. Here's what this file will include: