AutoGen 0.4 Tutorial - Create a Team of AI Agents (+ Local LLM w/ Ollama)
In this tutorial, we'll learn how to create AI agent teams that can take a prompt and output a YouTube shorts video automatically using AutoGen 0.4, integrate APIs like ElevenLabs & Stability AI, and run local LLMs with Ollama!

If you’ve been curious about AutoGen but haven’t known where to start, you’re in the right place! In this post, we’ll go hands-on with AutoGen 0.4, showing how easy it is to create a simple multi-agent workflow that integrates third-party APIs and tools.
Instead of just reading about AutoGen, we’ll build something practical—a small AI-powered system where agents collaborate to complete a task. You’ll learn how to:
- Set up a powerful AutoGen multi-agent team
- Attach tools that let agents use external APIs
- Use third-party SDKs (like text-to-speech or image generation)
- Enable JSON-formatted responses for structured outputs (Explained in the YouTube Video at the end of the post)
- Integrate a local LLM using Ollama
By the end of this tutorial, you’ll have a working AutoGen setup and a solid understanding of how to structure AI workflows using agents, tools, and external integrations.
Why AutoGen?
AutoGen is a framework for orchestrating AI agents, making it easy to build modular AI workflows where each agent handles a specific task. Instead of writing a huge monolithic script, AutoGen lets you break your logic into separate, reusable components that work together dynamically.
AutoGen agents can:
- Generate content using LLMs (OpenAI, Azure, local models, etc.)
- Call custom Python functions as “tools”
- Use external APIs (like text-to-speech, databases, or AI-generated images)
- Communicate with each other to collaborate on tasks
With AutoGen 0.4, things get even better with improved agent behaviors, response formatting, and better local LLM support.
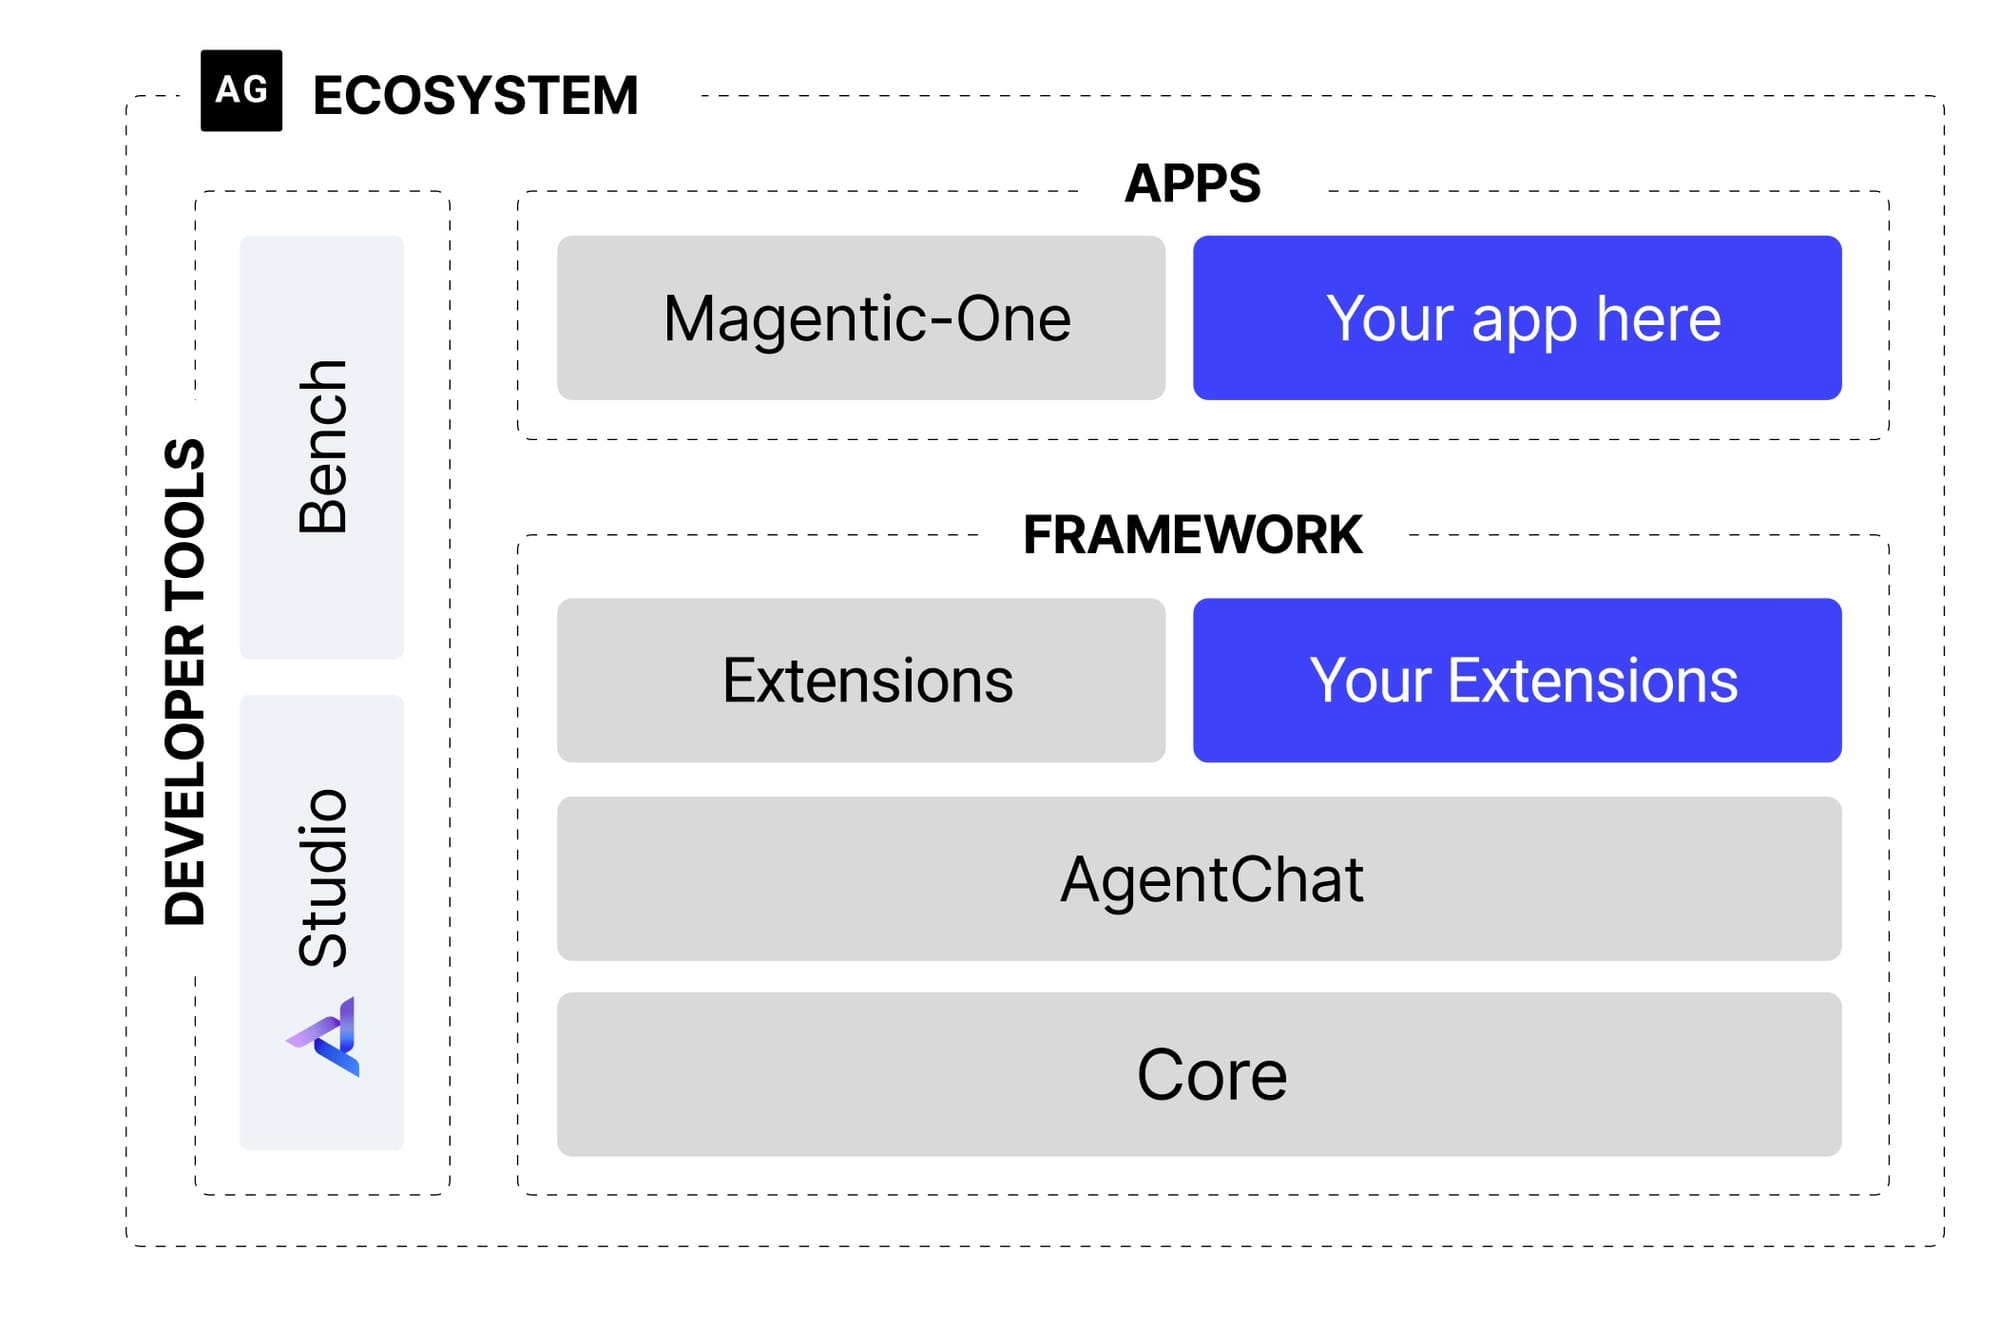
The diagram above gives us a clear overview of the AutoGen ecosystem. Today, we’ll focus on the Framework, which consists of three key parts:
• Core API – Handles messaging, event-driven agents, and supports both local and distributed runtimes. It also allows cross-language compatibility with .NET and Python.
• AgentChat API – This layer is built on top of the Core API, making it easy to prototype multi-agent workflows like two-agent or group chats. (We'll explore this API further in this tutorial)
• Extensions API – Expands the framework with both built-in and third-party extensions. It includes integrations for LLM providers like OpenAI and AzureOpenAI, as well as extra features like code execution.
This breakdown helps us understand how AutoGen’s framework is structured and how each part contributes to building AI-driven workflows.
Tutorial Overview: What We’re Building
For this tutorial, we’re building a simple AutoGen multi-agent system that is capable of turning your prompt into a shorts-style video using the following team of agents:
- A Script Writer agent that converts a prompt into captions for our video
- A Voice Actor agent that turns text into speech using a text-to-speech API
- A Graphic Designer that turns prompts into images used in the video
- A Director agent that coordinates everything and outputs the final work
Each agent will have its own role, and they’ll communicate using AutoGen’s built-in chat-based coordination system. Along the way, we’ll explore how to:
- Define agent behaviors
- Attach tools to let agents perform actions (like making API calls)
- Create and interact with the AutoGen team
- Use a local LLM with Ollama
- Return structured JSON responses
Let’s get started! 🚀
Step 1: Setting Up Your Project
1.1 Create and Activate a Virtual Environment
It’s always a good idea to isolate dependencies in a virtual environment.
For macOS/Linux:
python3 -m venv venv
source venv/bin/activate
For Windows:
python -m venv venv
venv\Scripts\activate1.2 Install Required Dependencies
With your virtual environment activated, install AutoGen 0.4 and any additional dependencies. In your terminal run the following commands:
pip install autogen-agentchat
pip install autogen-ext[openai]
pip install python-dotenv         # Optional, for managing API keys
pip install elevenlabs
pip install requestsautogen-agentchat is the AutoGen pip package supported by Microsoft. pyautogen refers to AG2, a different framework maintained by the original AutoGen creators. Watch this video for more info.You’ll also need API keys for any third-party services you’re using (e.g., OpenAI, ElevenLabs, Stability AI).
1.3 Create a .env File for API Keys
If you’re using OpenAI or any third-party services like ElevenLabs (for text-to-speech), you need to store API keys securely in your .env file. So let's create a .env file:
touch .env  # macOS/Linux
echo. > .env  # Windows
Then open the file and add your API keys:
OPENAI_API_KEY=your-openai-api-key
ELEVENLABS_API_KEY=your-elevenlabs-api-key
STABILITY_API_KEY=your-stability-ai-api-key
1.4 Load Environment Variables in Python
Let's create our main.py file now and inside we'll write the following code:
import os
from dotenv import load_dotenv

load_dotenv()

openai_api_key = os.getenv("OPENAI_API_KEY")
elevenlabs_api_key = os.getenv("ELEVENLABS_API_KEY")
stability_api_key = os.getenv("STABILITY_API_KEY")

tts_client = ElevenLabs(api_key=elevenlabs_api_key)
Cool! At this point, your virtual environment is set up, dependencies installed, and API keys configured. 🚀
1.5 Create Accounts for API Access
Next, you'll need API keys from the following third party services:
- ElevenLabs (For VoiceOvers): https://try.elevenlabs.io/gswithai (This is an affiliate link, meaning I may earn a commission if you make a purchase through them—at no extra cost to you.)
- Stability AI: https://platform.stability.ai/
Step 2: Creating AutoGen Agents
AutoGen agents are AI-powered components that work together to complete tasks. Each agent is assigned a role and (optionally) given tools that allow it to perform specific actions.
For this tutorial, we're going to create four different specialized agents. We'll start with our script writer, which is tasked with creating the script for our video.
2.1 Defining the Script Writer Agent
script_writer = AssistantAgent(
    name="script_writer",
    model_client=openai_client,
    system_message='''
        You are a creative assistant tasked with writing a script for a short video.
        The script should consist of captions designed to be displayed on-screen, with the following guidelines:
            1.	Each caption must be short and impactful (no more than 8 words) to avoid overwhelming the viewer.
            2.	The script should have exactly 5 captions, each representing a key moment in the story.
            3.	The flow of captions must feel natural, like a compelling voiceover guiding the viewer through the narrative.
            4.	Always start with a question or a statement that keeps the viewer wanting to know more.
            5.  You must also include the topic and takeaway in your response.
            6.  The caption values must ONLY include the captions, no additional meta data or information.

            Output your response in the following JSON format:
            {
                "topic": "topic",
                "takeaway": "takeaway",
                "captions": [
                    "caption1",
                    "caption2",
                    "caption3",
                    "caption4",
                    "caption5"
                ]
            }
    '''
)
The Script Writer agent is responsible for crafting a structured, engaging script from any given input. It follows a clear set of guidelines to generate five short, impactful captions that flow naturally—perfect for on-screen storytelling. By returning a structured JSON response, it ensures seamless collaboration with other AI agents in the workflow.
2.2 Defining the Voice Actor Agent
voice_actor = AssistantAgent(
    name="voice_actor",
    model_client=openai_client,
    system_message='''
        You are a helpful agent tasked with generating and saving voiceovers.
        Only respond with 'TERMINATE' once files are successfully saved locally.
    '''
)
The Voice Actor agent converts text into speech, generating and saving voiceovers for the script. It ensures the process is complete before signaling 'TERMINATE' for smooth workflow execution.
2.3 Defining the Graphic Designer Agent
graphic_designer = AssistantAgent(
    name="graphic_designer",
    model_client=openai_client,
    tools=[generate_images],
    system_message='''
        You are a helpful agent tasked with generating and saving images for a short video.
        You are given a list of captions.
        You will convert each caption into an optimized prompt for the image generation tool.
        Your prompts must be concise and descriptive and maintain the same style and tone as the captions while ensuring continuity between the images.
        Your prompts must mention that the output images MUST be in: "Abstract Art Style / Ultra High Quality." (Include with each prompt)
        You will then use the prompts list to generate images for each provided caption.
        Only respond with 'TERMINATE' once the files are successfully saved locally.
    '''
)
The Graphic Designer agent transforms captions into optimized prompts for image generation, ensuring a consistent ‘Abstract Art Style / Ultra High Quality’ across visuals. It finalizes the process by saving the images before signaling 'TERMINATE'.
2.4 Defining the Director Agent
Now, let’s create the Director Agent:
director = AssistantAgent(
    name="director",
    model_client=openai_client,
    tools=[generate_video],
    system_message='''
        You are a helpful agent tasked with generating a short video.
        You are given a list of captions which you will use to create the short video.
        Remove any characters that are not alphanumeric or spaces from the captions.
        You will then use the captions list to generate a video.
        Only respond with 'TERMINATE' once the video is successfully generated and saved locally.
    '''
)
The Director agent compiles captions into a cohesive short video, ensuring clean, alphanumeric text formatting before finalizing and saving the output. It signals 'TERMINATE' once the video is successfully generated.
Step 3: Adding Tools & API Integrations
Now that our agents are set up, we'll need to provide them with the right tools so that they accomplish their individual tasks.
3.1 Attach a Text-to-Speech API (Voice Actor Agent)
As you know, our voice actor needs to generate a voice over for each caption. To do this, we’ll use ElevenLabs for speech generation by wrapping it inside a tool:
from elevenlabs.client import ElevenLabs

...

def generate_voiceovers(messages: list[str]) -> list[str]:
    """
    Generate voiceovers for a list of messages using ElevenLabs API.

    Args:
        messages: List of messages to convert to speech

    Returns:
        List of file paths to the generated audio files
    """
    os.makedirs("voiceovers", exist_ok=True)

    # Check for existing files first
    audio_file_paths = []
    for i in range(1, len(messages) + 1):
        file_path = f"voiceovers/voiceover_{i}.mp3"
        if os.path.exists(file_path):
            audio_file_paths.append(file_path)

    # If all files exist, return them
    if len(audio_file_paths) == len(messages):
        print("All voiceover files already exist. Skipping generation.")
        return audio_file_paths

    # Generate missing files one by one
    audio_file_paths = []
    for i, message in enumerate(messages, 1):
        try:
            save_file_path = f"voiceovers/voiceover_{i}.mp3"
            if os.path.exists(save_file_path):
                print(f"File {save_file_path} already exists, skipping generation.")
                audio_file_paths.append(save_file_path)
                continue

            print(f"Generating voiceover {i}/{len(messages)}...")

            # Generate audio with ElevenLabs
            response = elevenlabs_client.text_to_speech.convert(
                text=message,
                voice_id=voice_id, # Choose from ElevenLabs
                model_id="eleven_multilingual_v2",
                output_format="mp3_22050_32",
            )

            # Collect audio chunks
            audio_chunks = []
            for chunk in response:
                if chunk:
                    audio_chunks.append(chunk)

            # Save to file
            with open(save_file_path, "wb") as f:
                for chunk in audio_chunks:
                    f.write(chunk)

            print(f"Voiceover {i} generated successfully")
            audio_file_paths.append(save_file_path)

        except Exception as e:
            print(f"Error generating voiceover for message: {message}. Error: {e}")
            continue

    return audio_file_paths
The purpose of the generate_voiceovers function (or tool) is to convert a list of messages into speech using the ElevenLabs API. It checks for existing files to avoid redundant generation, processes missing ones, and saves them in MP3 format.
We'll pass this tool to the agent's tools field. Let's update our voice_actor agent:
voice_actor = AssistantAgent(
    name="voice_actor",
    model_client=openai_client,
    tools=[generate_voiceovers], # <------
    system_message='''
        You are a helpful agent tasked with generating and saving voiceovers.
        Only respond with 'TERMINATE' once files are successfully saved locally.
    '''
)
3.2 Image Generation API (Graphic Designer Agent)
Just like our script writer converts the captions to voice overs, our graphic designer will use the Stability AI API to generate images based on text prompts:
...

stability_api_key = os.getenv("STABILITY_API_KEY")

...

def generate_images(prompts: list[str]):
    """
    Generate images based on text prompts using Stability AI API.

    Args:
        prompts: List of text prompts to generate images from
    """
    seed = 42
    output_dir = "images"
    os.makedirs(output_dir, exist_ok=True)

    # API config
    stability_api_url = "https://api.stability.ai/v2beta/stable-image/generate/core"
    headers = {
        "Authorization": f"Bearer {stability_api_key}",
        "Accept": "image/*"
    }

    for i, prompt in enumerate(prompts, 1):
        print(f"Generating image {i}/{len(prompts)} for prompt: {prompt}")

        # Skip if image already exists
        image_path = os.path.join(output_dir, f"image_{i}.webp")
        if not os.path.exists(image_path):
            # Prepare request payload
            payload = {
                "prompt": (None, prompt),
                "output_format": (None, "webp"),
                "height": (None, "1920"),
                "width": (None, "1080"),
                "seed": (None, str(seed))
            }

            try:
                response = requests.post(stability_api_url, headers=headers, files=payload)
                if response.status_code == 200:
                    with open(image_path, "wb") as image_file:
                        image_file.write(response.content)
                    print(f"Image saved to {image_path}")
                else:
                    print(f"Error generating image {i}: {response.json()}")
            except Exception as e:
                print(f"Error generating image {i}: {e}")
The generate_images function above takes a list of text prompts (our captions) and creates images using the Stability AI API. It checks if images already exist to avoid duplicates, then sends requests to generate and save new images in WEBP format. If something goes wrong, it logs the error and moves on to the next prompt.
So far so good?
Our last agent, the Director will need to put everything together. For this to happen we'll use FFmpeg.
generate_video at the end of this post.Step 4: Creating the AI Workflow in an Interactive Console
# Set up termination condition
termination = TextMentionTermination("TERMINATE")

# Create the AutoGen team
agent_team = RoundRobinGroupChat(
    [script_writer, voice_actor, graphic_designer, director],
    termination_condition=termination,
    max_turns=4
)

# Interactive console loop
while True:
    user_input = input("Enter a message (type 'exit' to leave): ")
    if user_input.strip().lower() == "exit":
        break

    # Run the team with the user input and display results
    stream = agent_team.run_stream(task=user_input)
    await Console(stream)
Step 5: Running the AutoGen Team
python3 main.pyWe’ll orchestrate agent communication using RoundRobinGroupChat, where each agent takes turns in a conversation.
So let's run this app and see what we get!
Let's ask our script writer to create a story about: "A tourism ad for a beautiful island".
Here's what happens when we run this prompt, press play to watch every step of the process:
Local LLM Support using Ollama
OllamaChatCompletionClient. Check out my new post about this update.I'm assuming you're familiar with Ollama and you've set it up on your machine. If you haven't already and need some help, check out my video here to see how this is done. It's super easy and quick!
Ok, let's swap the model_client which uses OpenAI's GPT-4o to power our script writer with the llama3.2 LLM running locally. To do this, modify the model_client parameter like this:
...

script_writer = AssistantAgent(
    "script_writer",
    model_client=OpenAIChatCompletionClient(
        model="llama3.2:latest",
        api_key="placeholder",
        base_url="http://localhost:11434/v1",
        model_info={
            "function_calling": True,
            "json_output": True,
            "vision": False,
            "family": "unknown"
        }
    ),
    ...
...
So, what's happening here? the script_writer will now use the specified model llama3.2:latest which is accessible through Ollama using the specified base_url. The model_info parameters are required.
Final Thoughts
We just built a complete AI agent team with:
✅ Multi-agent collaboration
✅ External API integration using tools
✅ Local LLM support (Ollama optional)
🚀 Next Steps:
👉 Try modifying the agents for different tasks
👉 Experiment with other third-party APIs
👉 Integrate AutoGen with a real-world app
🔗 Resources:
Disclosure: Some links below are affiliate links, meaning I may earn a commission if you make a purchase through them—at no extra cost to you. This helps support the channel and allows me to keep creating content. Thanks for your support!
- Microsoft AutoGen: https://github.com/microsoft/autogen
- ElevenLabs (Text to Speech): https://try.elevenlabs.io/gswithai
- Stability AI: https://platform.stability.ai/
- Ollama: https://ollama.ai/
💬 Have questions? Drop a comment below! 👇